A Startup Folder is a place where a set of shortcuts of programs are stored. These programs are dedicated to running automatically as soon as the operating system launches. By default, Windows Startup Folder remains hidden in File Explorer. However, you can apply any of the workarounds shared below to access the startup folder on Windows 11.
Why Must You Access The Startup Folder On Windows 11?
Well, there are a few reasons why users must be looking for Windows 11 Startup Folder on their computer. For starters, to check & monitor the programs and apps that get automatically launched when you start your computer. Secondly, to remove unwanted startup programs that are responsible for increasing the overall boot time.
Now without further ado, let’s take a look and learn how to find and access the Windows 11 Startup Folder.
How To Access Startup Folder On Windows 11
Since Startup Folder on Windows is hidden deep inside the drive folders, you need to implement a set of steps to find and access the same. In this article, we will discuss three different methods to find your Windows 11 Startup Folder.
WORKAROUND 1 = Through File Explorer
One of the easiest ways to get your hands on the Startup Folder is through File Explorer. Simply, follow the instructions shared below:
STEP 1 = Navigate to the Start icon and right-click on the same to select File Explorer.

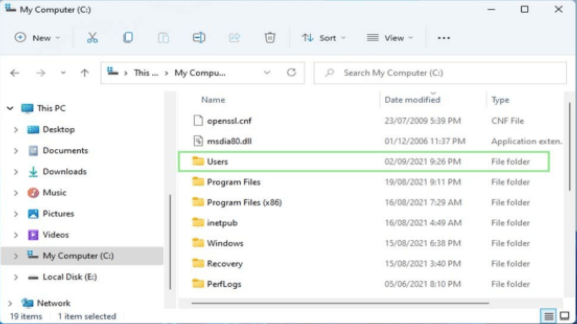
STEP 2 = From the File Explorer window, you need to click on the C: drive (which is located at the left-side panel).

STEP 3 = From the next window that appears on the screen, you need to locate Users folder. Refer to the screenshot shared below to get a clearer idea.
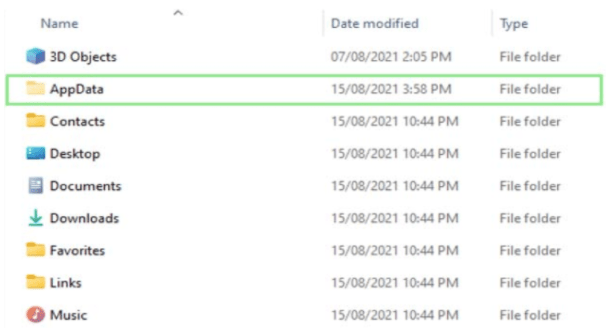
STEP 4 = Under the Users folder, you need to select your user as shown below. Further, you need to find and hit the AppData folder. Make sure there are no items under the hidden folder. For this, we advise you to check the File Explorer’s View Settings.
STEP 5 = At this point, you need to follow the path as mentioned below:
Roaming > Microsoft > Windows > Start Menu > Programs

STEP 6 = That’s it! You can see the Startup folder under the Programs folder.
Now you can check and manage the Startup items according to your needs and preferences.
WORKAROUND 2 = Using Shell Command
Here’s another method that can help you access the startup folder on Windows 11. You just need to execute a short command line and you’ll be able to find the folder.
STEP 1 = Launch the Run window on your machine. You can press the shortcut keys – Windows + R to open the same.
STEP 2 = Once launched, you need to type the command line- – shell:startup and hit the Enter button.

STEP 3 = As soon as you hit the Enter button, you will be automatically redirected to the Windows 11 Startup folder. Here you can see the bunch of folders and app shortcuts.

That’s it! If you wish to launch certain programs at the Startup, you should drag and drop the app’s shortcuts to this folder and you are good to go. If you wish to stop certain items from launching at the startup, simply remove them from this folder!
WORKAROUND 3 = Via Run Command
Here comes another effective workaround if you want to access the startup folder on Windows 11, you can try using the Run command.
STEP 1 = To launch the Run window on your machine, press the shortcut keys – Windows + R.
STEP 2 = As soon as the Run dialog box appears on your machine, simply copy and paste the following location: %appdata%\Microsoft\Windows\Start Menu\Programs\Startup in the Run dialog box and hit the Enter button!

STEP 3 = As soon as you hit the Enter button, you will be automatically redirected to the Windows 11 Startup folder.
Now you can start managing the Startup Programs according to your needs and preferences. This is probably one of the easiest ways to access the startup folder on Windows 11.
How To Add Or Remove Startup Programs On Windows 11?
Follow the instructions carefully to learn the step-by-step process of adding startup items on your Windows 11 PC:
STEP 1 = To get started, simply click on the Windows Start menu.

STEP 2 = Now find and select Settings from the menu.

STEP 3 = At this step, you need to navigate to the Apps section, located on the left-side panel.
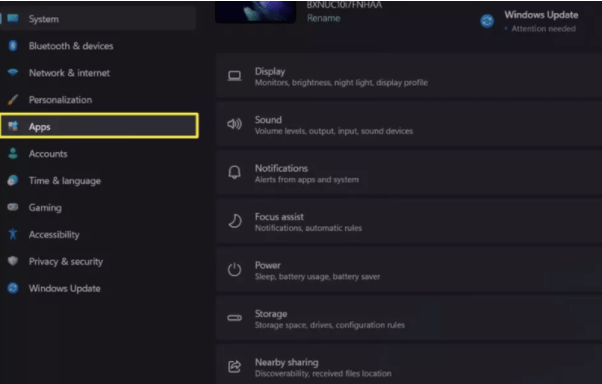
STEP 4 = Under the Apps section, you need to scroll down a bit and choose Startup option.

STEP 5 = That’s it! A list of apps with toggle buttons will appear on your screen. You can toggle on or off to add or remove a program for Startup.

Isn’t it an effortless method to manage Startup items on Windows 11? Do share your opinion in the comments section below!
Alternative Way To Manager Startup Programs On Windows 11
Well, you can follow the instructions shared above to manage and remove Startup items on Windows 11. But we are sharing another effective way to eliminate unwanted Windows 11 Startup Programs. Hope it helps too!
We recommend our users to take the help of a dedicated Startup Manager for Windows 11. The market has tons of applications that would help you to enable/disable or add/remove startup items easily from one dashboard. Additionally, using a reliable Startup Management Program will help you gain a noticeable performance boost in a single go. Our recommendation is, to try using CCleaner. It has multiple modules for cleaning, optimization, and protection for your Windows operating system.
In case you have any other suggestions for this category, do mention it in the comments section below. Hopefully, this guide will be helpful for you when it comes to easily accessing the startup folder on Windows 11. If you have any queries, do not hesitate to share with us in the comments section below. But before you go, let’s take a look at a quick method to add or remove Startup programs on Windows.