Encountering the “Undoing Changes to Your Computer” message in Windows can be frustrating during system updates. This guide provides effective solutions to troubleshoot and resolve this issue, ensuring your computer successfully completes the update process.
Whether you’re experiencing looped restarts or stuck on this screen, these methods will help restore normal functionality to your Windows system. Follow these steps carefully to regain access to your computer and prevent future update interruptions. Learn how to fix the “Undoing Changes to Your Computer” issue and maintain a stable Windows environment.
Reason behind Windows 11,10 Undoing Changes Made to Your Computer Error

There are a lot of factors that are causing the “undoing changes made to your computer error”.
- The current version of Windows OS can have some malicious software installed on your computer.
- The software distribution folder has some corrupted files and folder that causes the update failure.
- Sometimes your system does not have enough resources to install the patches related to your newer version update.
Low volume can cause “undoing changes made to your computer error” and there are a few steps to solve this issue in Windows 11.
Phase 2: Steps to resolve undoing changes made to your computer
One of the instant solutions is to use the Windows Boot Genius which is mainly used to solve the booting issues that occur while updating and also help for crashed systems to recover again. You can use this software to fix the undoing changes made to your computer. It will also be used for recovering data after factory reset mode.
Sometimes potential issues cause big problems in our Windows 11 So that’s why you have to update your system frequently due to some update issues like undoing changes errors made to your computer can cause huge data loss and improper working condition of our Windows 11 So you need to follow all the instruction and apply each solution one by one if any suitable for you to work with.
How to Fix Windows 11 Undoing Changes Made to Your Computer
Here are the 9 ways to fix Windows 11 undoing changes made to your computer
1. Going onto Safe Mode
Step-1: First of all, you need to Enter into Safe mode on your PC.
Step-2: Press F11 to your Windows PC While it’s booting up/Startup the Undoing change error message occurs Click onto the advance option.
Step 3: Choose the “Startup Setting” Option
Step-4: Select the Enable Safe Mode option it will run Windows into safe mode and apply the fixes mention below.
2. Remove the Recent Updates
Step-1: First You need to remove recently installed updates on your computer.
Step-2: Press the Windows + R combination Which opens up the Run
Step-3: Type “appwiz.cpl” in the Run field

Step-4: Hit OK
Step-5: Select the recently installed updates from the shown list
Step-6: Delete the Recent Updates
Step-7: Restart your computer after Uninstalling updates
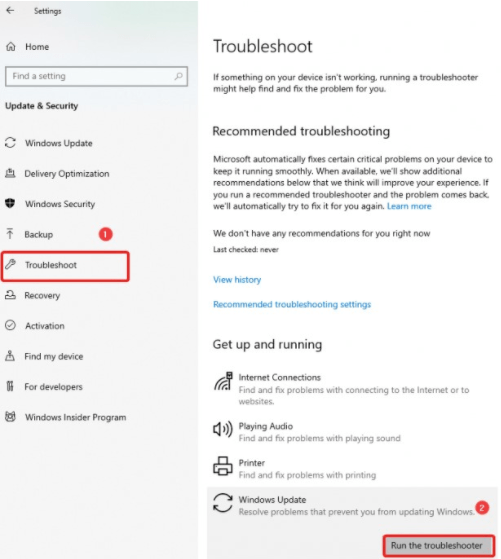
3. Start Windows Update Troubleshooter
Windows update Troubleshooter easy mot straightway to troubleshoot our entire system and scan the whole platform for corrupted files and folders to identify actual reasons behind the Crashes and update failure.
Here are some Steps to follow:
Step-1: Open the search option
Step-2: Type “Troubleshooter” in the search bar
Step-3: Opens up the Troubleshoot settings

Step-4: Find the Windows update troubleshooter and select “Run the Troubleshooter”
Step-5: Windows Update Troubleshooter will automatically detect the errors if any and display them to you.
4. Using the Startup Repair
Startup Repair functionality can resolve the issues of startup programs like undoing changes made to your computer error is one of them.
Step-1: Restart Your computer from Windows key
Step-2: Open the troubleshooter exactly after the blue screen appears
Step-3: Choose the “Advanced Options” From that
Step-4: It will show you the Startup repair option click on that

Step-5: Enter your password on the Startup repair tool and proceed
5. Using DISM tool
DISM tools give you the most effective solution to directly working with a system image file that contains the entire OS and its updates to directly get os images find the causing area of error and resolve that error by the following steps:
Step-1: DISM Stands for Deployment Imaging Servicing Management a command-line tool that can repair Windows corrupted images and also do scanning to fix undoing changes made to your computer.
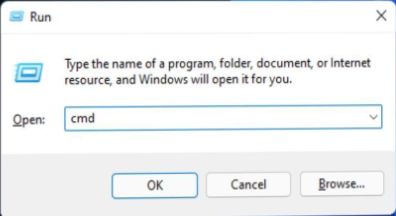
Step-2: Press the Windows + R key, type “cmd” Command
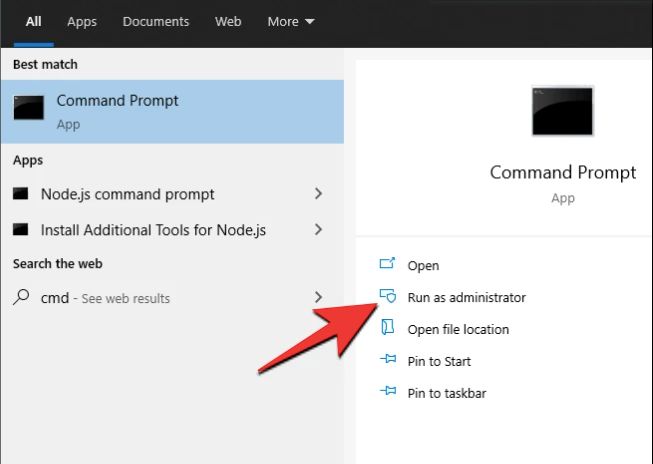
Step-3: Open cmd and run as an Administrator on your computer

Step-4: Then Type DISM /Online /Cleanup-Image /RestoreHealth & hit enter
6. Remove the Software Distribution Folder
The software Distribution Folder in our file system contains every kind of file and folder that are installed while updating the OS and also that folder contains corrupted files that you can easily find and delete easily by using the following steps:
Step-1: Removing the Software Distribution folder from the system can resolve your undoing changes made to your computer error easily because that folder contains all kinds of update files and patches.
Step-2: Press the Windows + R key, type “cmd” Command

Step-3: Type the following commands line by line:
net stop wuauservnet stop bitsnet stop cryptSvcnet stop msiserver
Step-4: Now open the File Explorer from the System
Step-5: Open Windows/SoftwareDistribution Folder
Step-6: Select All Files with Ctrl + A
Step-7: Delete all the Files inside this folder
Step-8: Open cmd again as an Administrator
Step-9: Type the following commands line by line to restart all Services:
net start wuauserv
net start bits
net start cryptSvcnet start msiserver
Step-10: It’s time to restart your PC
7. Using the App Readiness Service
Step-1: Sometimes Users can figure out this way to resolve the undoing changes made to their computer error with the use of App Readiness services.
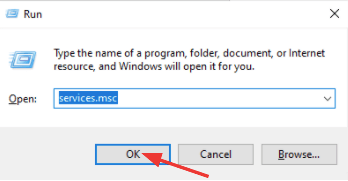
Step-2: Press the Windows + R key, type “services.msc” Command

Step-3: Find App Readiness Service and Open up by double-clicking
Step-4: Open Property Out of that Select the “Automatic” From Startup
Step-5: Apply the changes and Click OK
Step-6: Restart your PC After the App Readiness Service modification
8. Using the System File Checker
If the above phases are not more efficient for you then you can apply a direct SFC Scan to your system with whole diagnostics that gives you immediate scanning criteria to identify the glitch that causes the rundown to your Windows 10 in your computer.
Here are some steps that you have to follow for SFC Scan:
Using the System file checker scan You can manually scan our entire file system for corrupted files to find them and remove them easily.
Step-1: Press Windows + R key, type “cmd” Command
Step-2: Open cmd & Run as an Administrator on your computer

Step-3: Enter this command sfc /scannow in the Command Prompt, and hit enter.

Step-4: SFC Scan must be done in a particular time frame you have to wait for that the whole file system scan.
Step-5: After the Successful Scan, Restart your Computer
9. Disable Windows Auto Update
Disabling Windows update is not a pitch-perfect solution to undoing changes made to your computer error but it’s quite effective for getting a manual update as per your requirements. You can follow these steps to prevent this:
Using the System file checker scan You can manually scan our entire file system for corrupted files to find them and remove them easily.
Step-1: Press the Windows + R key, type “cmd” Command
Step-2: Open cmd & Run as an Administrator on your computer

Step-3: Enter this command “services.msc” in the Command Prompt, and hit enter.

Step-4: Find the Windows Update Service Utility and double-click to open it.
Step-5: Click on the Disable Option and Hit on Apply
Step-6: Click OK and Restart your computer
Conclusion On Windows 11 Undoing Changes Made to Your Computer
This blog will help you to fix Windows 11 undoing changes made to your computer error with the help of these solutions. Also if you are facing startup processing issues and booting interruption while updating Windows 11 or restarting your computer you can use third-party software like Windows Boot Genius to resolve issues.
Also read
- Xvdd SCSI Miniport Issues
- Fixing C Stage 1
- Fixing C Stage 2
- Logitech G Hub Not Working
- Disable Automatic Driver Updates in Windows 11
- AMD Driver Crash in Windows 11
- Get iMessage On Windows 11
- How to Repair Windows 11
- Fortnite Not Launching On PC
- Valorant Not Working on Windows 11
- Filmora X Not Working In Windows 11


