
The power and sleep settings in Windows 10 keep your computer in good condition. It enhances the performance of your system and also saves the right amount of energy. If you want to keep your PC well maintained, you need to preserve its battery life, and you need to take care that it is performing well.
After doing the upgrade, you need to change the power and sleep settings in Windows 10. When you install Windows 10, so many things get changed in your PC. It would help if you made sure that to keep your PC secure, you are changing every setting required to be changed.
Change Power and Sleep Settings In Windows 10
1. Power settings
Now, let’s get our hands dirty and access these power settings! It’s simpler than you might think. Head to the Start menu and type in “Power.” Click on “Edit Power Plan” to explore your current power plan’s settings. Here, you’ll have a bird’s eye view of all available power plans. Feel free to switch between them or even create your own custom power plan by tweaking settings from the existing plans.
When you fire up your Windows 10 device, it comes pre-loaded with a set of default power plans: Balanced, High Performance, and Power Saver. Each plan caters to distinct user requirements.
Balanced:
The first option you see is named Balanced. It is the best power plan for users. The Balanced option is also recommended by the computer. If you will notice right with the balance, there is a recommended written in the bracket. The option balances the energy and the performance of your computer automatically. If you want to save battery and enhance the PC’s performance, you need to select a balanced option.
High performance:
The high-performance option is used to increase the performance of your PC. The good part is that it increases the screen brightness and also enhances the performance of your system. The option is not used to save energy. Whenever you use the PC on high-performance settings, you enjoy your PC’s performance, but you lose the battery life sooner. As we say, if you need something good in quantity, then you have to lose something with that as well.
Power saver:
The last option you have which you can choose is Power saver. As the name suggests, it saves the power of your PC. It lowers the brightness, and by selecting the Power saver, you keep the energy and battery of your system.
The only drawback of the option is that it doesn’t increase the performance of your system. In power saver mode, there are some apps that you cannot even use. Power saver increases battery life but doesn’t improve the performance of your system. It is your choice what power mode you want to choose while running Windows 10.
How to Change Power Settings in Windows 10
To change power and sleep settings in Windows 10, you need to change the power settings first. You need to follow the steps to change the power settings.
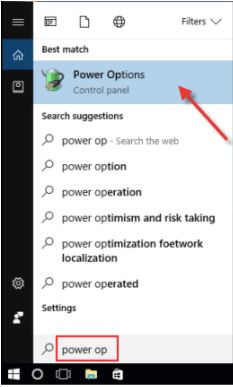
1. Open the start menu and go to the search bar.
2. Type Power Options in the search bar.
3. Click on the Power Options.
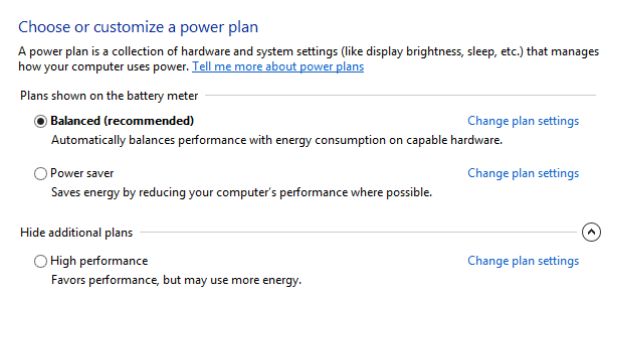
4. In Power Options, you will get three options: Balanced, High Performance, and Power saver. You can choose any three of them.
Hence, to change power and sleep settings in Windows 10, you can change the power settings first. Now, next, you need to change the sleep settings.
2. Sleep Settings
Ah, sleep mode – the power-saving hero! This feature puts your computer into a low-power state, turning off the display during idle moments. To customize these settings, head to Start, then Settings > System > Power & Sleep. Here, you can dictate when your device should turn off its screen and when it should doze off into sleep mode.
Now, here’s a tip: instead of shutting down your computer entirely and restarting, putting it in sleep mode preserves its current state. When it wakes up, it resumes right where you left off. But remember, security-wise, shutting down your device is a safer bet.
How To Change Sleep Settings In Windows 10
Sleep settings are used to preserve the energy of your PC. By adjusting the sleep settings, your PC’s display will be off. It will save the power of your system when you are not working on it. You need to set the sleep settings by deciding when you want to turn your PC’s display when you are not working on it. When your PC accesses the sleep settings, it will only shut your production.
When you want to use it again, you don’t need to turn it on or even have to reboot. You can restart your work where you have left it. You can change power and sleep settings in Windows 10 according to your wish. To change the sleep settings, you need to follow the instructions.
1. Open the start menu and go to the search bar.
2. Type Power Options in the search bar.

3. Click on the Power Options.
4. In Power Options, you have chosen one option between Balanced, high performance, and Power saver.
5. Whatever Power option you have chosen, you have to click on the Change a Plan settings option available on the right side of it.
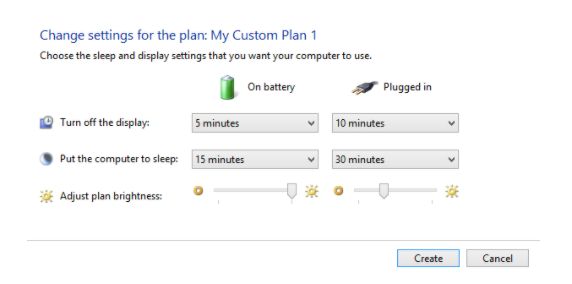
6. It would help if you chose the time of Turn off the display option and select the time of Put the computer to sleep option.
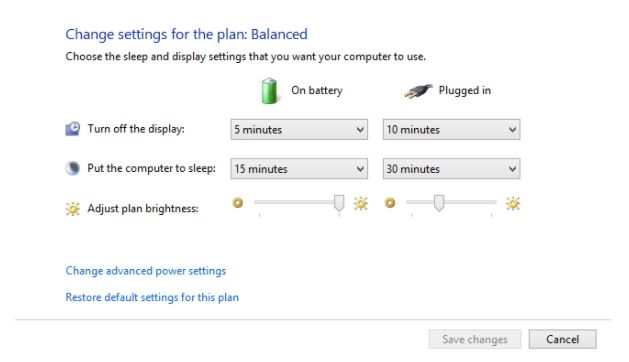
Here you will be able to adjust the Sleep settings in Windows 10.
You are successful in changing power and sleep settings in Windows 10 by using the above methods.
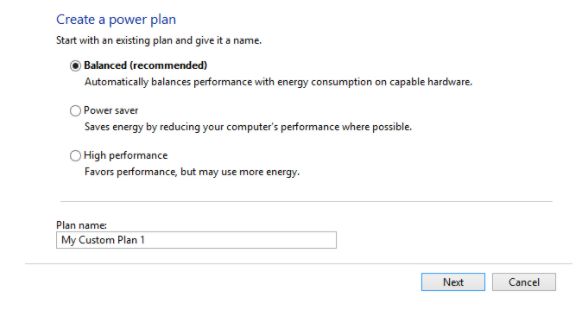
Create a Power Plan
You can also change power and sleep settings in Windows 10 by creating your power plan. For that, you need to follow the steps.
1. Open the start menu and go to the search bar.
2. Type Power Options in the search bar.
3. Click on the Power Options.
4. In Power Options, you need to choose the Create a Power Plan option.
5. You have to select your Power plan’s name and fill it in under the My plan section.
6. Click on the Next button.
7. In the next windows, you can choose the time of Turn off the display option and select the time of Put the computer to sleep option.
8. Next, you can adjust the brightness of your power plan.
You will be able to make your power plan and change power and sleep settings in Windows 10 anytime.
What is Hibernation
Ever heard of hibernate mode? It’s like sleep mode, but even more power-efficient. Hibernate mode essentially shuts down your computer while saving its current state, allowing you to pick up where you left off once you boot up again.
To configure these settings, follow the same steps as adjusting sleep settings. Look for the “Hibernate after” option to set the idle time before your computer enters hibernate mode.
Manual Control: Sleep and Hibernate Activation
If you fancy putting your device to sleep or hibernation manually, Windows 10 offers that control too! Navigate to Power Options, click on “Choose what the power button does,” then “Change settings that are currently available.” From here, you can determine whether your device should sleep or hibernate when you press the power button or close the lid.
Conclusion
As we bid adieu, remember that the choice between sleep, hibernate, and shutdown depends on your usage pattern and needs. Optimizing your power and sleep settings in Windows 10 isn’t just about convenience; it’s about maximizing efficiency, prolonging battery life, and keeping your system in top-notch shape. So, play around with these settings, find your sweet spot, and let Windows 10 adapt to your lifestyle seamlessly!
Also Read


