Updating your Windows and drivers is very necessary as it plays a major role in boosting the system performance and with the Windows update several bugs automatically got fixed. But when Windows updates itself automatically, all the drivers that are installed on your PC also update to their latest version.
Most of the time users do not want automatic updating of the driver which is why they are looking for methods that can help in disabling automatic driver updates. If you are also one who is fed up with automatic driver updates and want to disable automatic driver updates in Windows 11 then you are at the right place.
In this article, we are going to discuss the best ways through which you can disable automatic driver updates in Windows 11. The methods are easy and effective and by following the simple steps you can get rid of automatic driver updates.
What are Automatic Driver Updates
Microsoft regularly releases the latest updates for Windows, so whenever Windows find any latest update it automatically installs the latest drivers for devices that are installed on your PC.
Although the latest updates help in enhancing the system performance, fixing bugs and maintaining the good health of your system many users don’t want to update their system drivers automatically. In Windows 11, auto Update is enabled by default so whenever any new release or latest version is found by Windows it automatically installs on your PC.
Many users are there want to update the drivers manually and that is why they want to disable the automatic driver update. There are several ways through which you can easily disable automatic driver updates in Windows 11.
How to Disable Automatic Driver Updates In Windows 11
In this article, we will discuss the most effective methods that will help you in disabling the automatic driver update. So, without any delay let’s get started.
Method 1: Pause Auto Updates to Disable Automatic Driver Updates
If you do not want to disable automatic driver updates in Windows 11 permanently but temporarily then you can also follow this method. You can pause auto-updates to disable automatic driver updates by following the steps:
1. Firstly, navigate to the start option and then click on the Settings option.
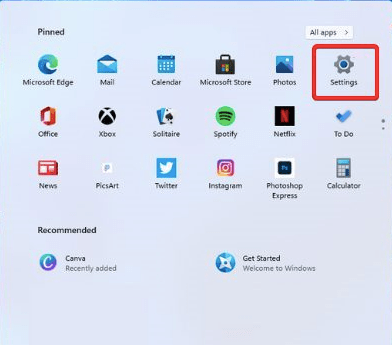
2. When the settings window appears, click on update and security.
3. After that, click on Windows Update from the left pane.
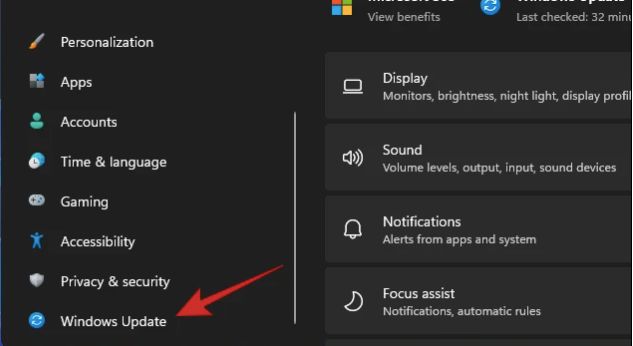
4. Next, click on pause updates for 7 days from the right side of the window.
5. After that, click on the advanced options given at the bottom of the page.
6. Navigate to the pause update section and click on the drop-down arrow to select the date till you want to pause the updates.
This method can stop the updates for 35 days. After the period is over your PC will automatically install the new updates.
Method 2: Disable Automatic Driver Updates Using Group Policy
Another effective method to disable automatic driver updates in Windows 11 / 10 is using Group Policy. In Windows 11 we get a feature of group policy through which you can permanently disable the automatic updates. Follow the below-given steps to execute this method:
1. Firstly, go to the start menu, and in the search box type gpedit.msc. Alternatively, you can also press the Win+ R keys together on the keyboard.
2. And when the run box appears, type gpedit.msc in the box.
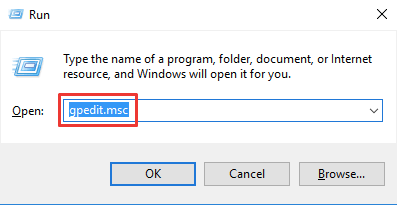
3. Hit enter key and it will open Group Policy Editor.
4. After that, move to the following path:
Computer Configuration > Administrative Templates > Windows Components > Windows Update > Manager End-User Experience
5. Now, from the right side of the page, navigate to the do not include drivers for Windows updates and double-click on it.
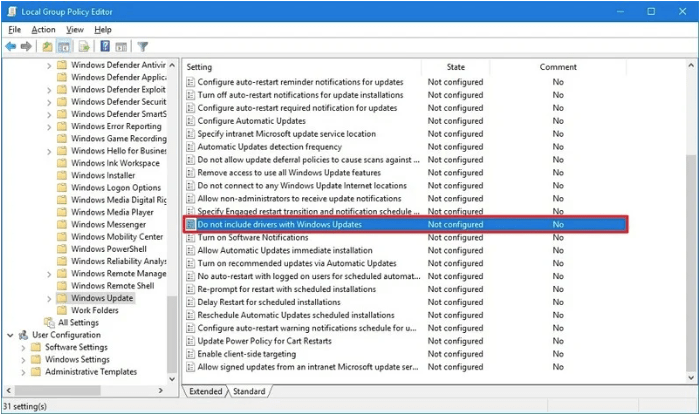
6. In the configure automatic updates window, click on the enabled option.
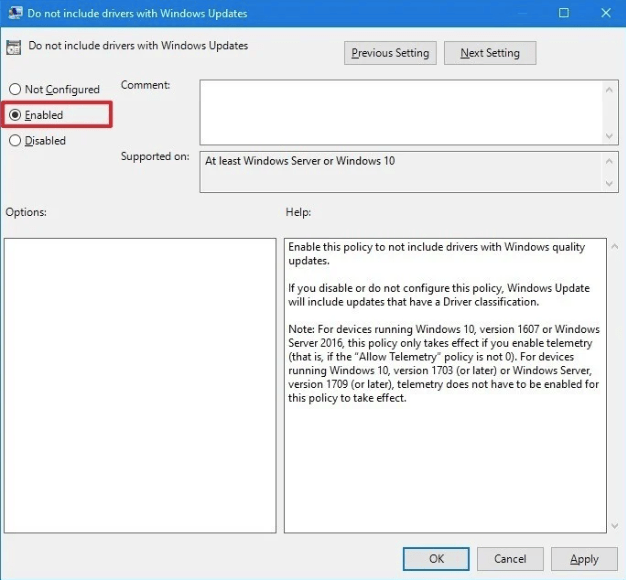
7. Lastly, click on Apply and Ok to save changes.
This method will disable automatic driver updates in Windows 11 / 10 and whenever any update is available it will notify you if you want to download the latest update then you can manually click on install now.
Method 3: Use Windows Registry To Disable Automatic Driver Update
You can disable automatic driver updates Windows 11 by using Windows Registry Editor. Below are the steps you need to follow to execute this method:
1. Firstly, press Win + R keys together on the keyboard to open the Run box.
2. And then type Regedit and hit the enter key.
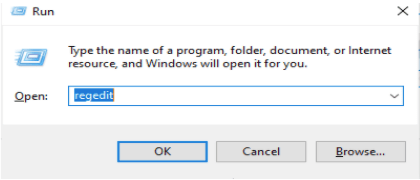
3. When the registry editor window appears navigate to the following path:
HKEY_LOCAL_MACHINE\SOFTWARE\Policies\Microsoft\Windows
4. After that, navigate to the Windows folder and click right on it and click on new and then key.
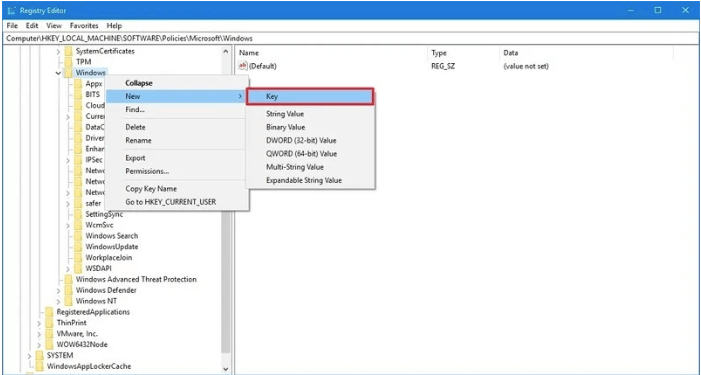
5. Give it a new name Windows Update and press enter key.
6. Again right-click on Windows Update and then click the new and then key.
7. Give it the name AU and press enter key.
8. Right-click on the vacant area of the right window and click on new and then DWORD (32-bit) Value.
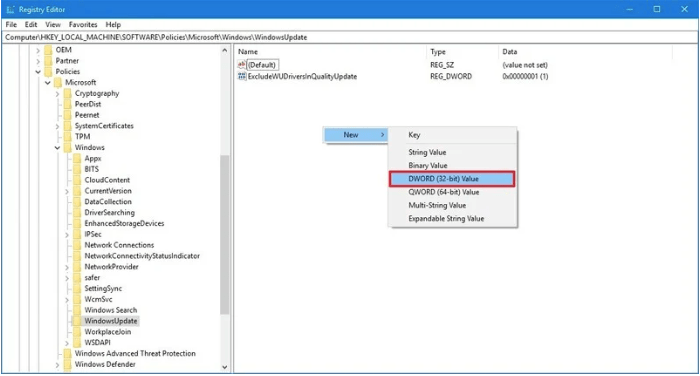
9. Name the key NoAutoUpdate and hit the enter key.
10. Double-click the new key and set the value 1.
11. At last click ok. Now, restart your PC.
This method will permanently disable automatic driver updates in Windows 11.
Method 4: Disable Driver Automatic Updates Using Control Panel
Use Control Panel to disable automatic driver updates in Windows 11. Below are the steps you need to follow to use the control panel:
1. Firstly, click on start and type change device installation settings in the search box.
2. Click on the relevant search result to open the device installation settings window.
3. Next, click on Yes and then save the changes. Now, automatic driver service will be stopped.
Method 5: Windows Update Services can Also Help in Disabling Automatic Driver Update
You can also disable automatic driver updates in Windows 11 by using Windows Update Services. It is quite a simple method and easily turns off the automatic update services in Windows 11. You just need to follow some easy steps to execute this method:
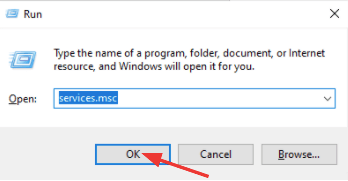
1. Firstly, open Run box by pressing Windows + R keys together on the keyboard.
2. Next, you need to type services.msc in the box and hit enter key.
3. When the services window appears, navigate to the Windows update by scrolling down the page.

4. Double-click on Windows update and the next window will appear.
5. In the Windows Update Properties window, click on the general tab.
6. Next, go to the startup type and click on the drop-down arrow and choose disabled
7. At last, click on the ok option and that’s it.
Restart your PC and now, your system will not update automatically. But in the future, if you want to change the settings and allow your system to update automatically then again follow the same steps and again click the drop-down arrow and select Automatic.
Conclusion
In conclusion, mastering the art of disabling automatic driver updates in Windows 11 grants users control over their system’s stability and performance. By following these steps, you’ve gained the knowledge to tailor your driver updates to your preferences.
Whether it’s to prevent potential compatibility issues or simply to have a more hands-on approach, these insights empower you to navigate the Windows 11 experience with confidence. We trust this guide has provided clarity, offering a seamless and personalized solution to manage your device drivers effectively. Your journey to customize your Windows 11 experience is now in your capable hands.
Also Read

