Windows 10 comes with a special feature that installs the driver automatically whenever you plug in any device like speakers, printers, etc. First windows update installs the new drivers. But this is not a good feature of Windows 10 as sometimes the driver is not compatible with the device that is installed by the Windows update or the installed driver is not up to date.
So, in that situation, you need to disable the Automatic Driver Updates in Windows 10. It is quite easy to disable the automatic driver updates by following some steps involved in the method.
How to Disable Automatic Driver Updates on Windows 10
In this article, we will discuss the top four methods through which you can easily disable automatic driver updates in Windows 10.
Method 1: Group Policy
You can disable automatic driver updates by using the Group Policy. This is one of the best methods for professional users who have great computer skills. Below are some steps you must follow to disable Automatic Driver Updates in Windows 10:
- Firstly, press the Windows + R keys together to open the run box type gpedit.msc and hit the enter key
- When the Group Policy Editor page opens up, navigate to Computer Configuration then Administrative Templates > Windows Components > Windows Update. Now, on the right side of the window under the setting option, click on Configure Automatic Updates
- On the next window, tick the enabled option and choose to Notify for download and auto-install
- Then click apply and at last click on OK
- Now, go to the Type to search here box type Windows Update and choose Windows Update Setting from the options
- At last, restart your computer to complete the changes
Now, Windows will let you know if there is any update of the driver available but it will not automatically update them after you apply the changes in the Group policy.
This way you can easily disable the automatic updates on your PC. Otherwise, you must see alternate methods in the list.
Method 2: Via Registry
You can disable automatic driver updates using the registry. But you need to pay attention while performing the steps as it is quite complicated. If you perform anything wrong then your computer might face a severe problem and can lack performance. So, before executing the process, firstly take the backup of the full system.
Below are the steps you must follow to disable automatic driver updates in Windows 10 by the registry:
- Firstly, hold Windows + R keys together to open the Run bar
- Type, Regedit and press enter key on the keyboard
- Now, search for HKEY_LOCAL_MACHINE > Microsoft > Windows > CurrentVersion > DriverSearching
- Now, on the right side of the window click on SearchOrderConfig
- In the pop-up window, modify the number to 0 (From 1 which is the sign of automatic driver updates allowed by the system) and click OK
- At last, restart your PC to apply the changes
Method 3: Change Windows settings
You can disable automatic driver updates in Windows 10 by changing the system settings. Below are the steps that you just follow to change the settings:
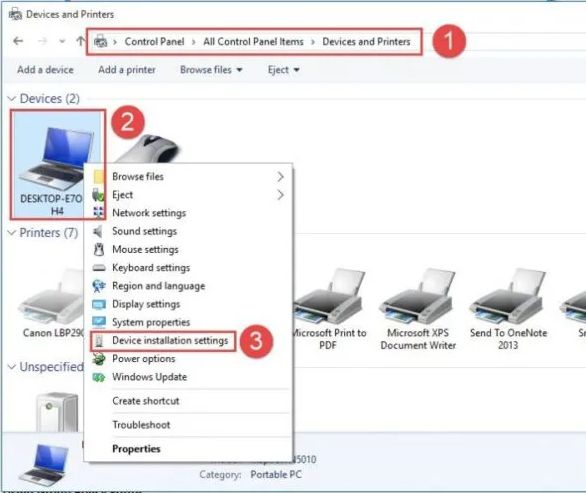
- Just go to the Control Panel
- For this, click on type here to search box and type Control Panel and press the enter key
- Once the Control Panel window opens, click on the System and Security option to land on the next page is the system
Or you can Press the Windows + X keys together which will open a list, choose the system from the options, and then look for the Related settings option and click on system info which is given under the related settings.
- When the system window appears, click on the Advanced System settings
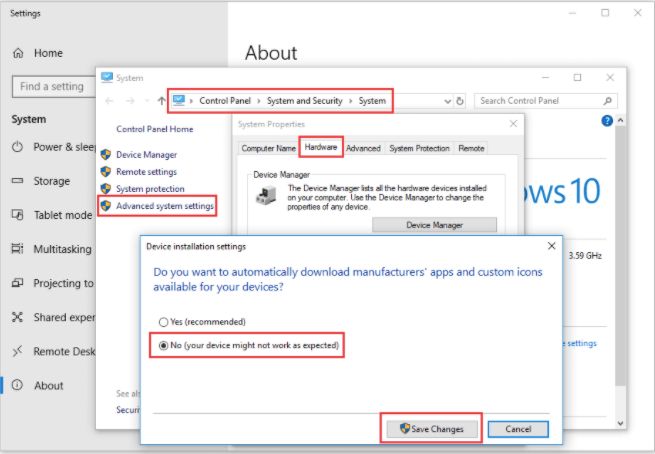
- A system properties window will open, now, tap on the Hardware tab
- Now, click on the Device Installation Settings option
- A pop-up message will appear stating that “do you want to automatically download the manufacturer’s apps and custom icons available for your device?” Tick the No (your device might not work as expected) option.
- At last, tap on save changes and restart your computer to apply changes
Stop the Windows Update Service
You can disable automatic driver updates by disabling the Windows Update service. Below are the steps you need to follow to change the Windows Update service:
- Firstly, press the Windows + R keys together to open up Run Bar
- Type services.msc and press enter key on the keyboard
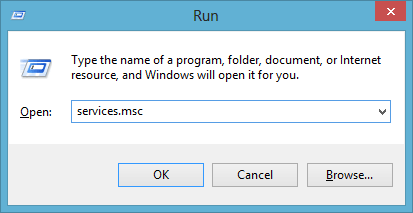
- When the Windows page opens up, look for the Windows Update service option in the list, click on it
- Windows update properties page will appear, go to the startup type option and change the manual to disabled
- At last click OK and restart your PC
Conclusion
In the above article, we have discussed four different methods to disable automatic driver updates in Windows 10. Although all the methods are effective and easy to use I suggest you choose the Registry method only when you are a professional user.
The registry method is quite difficult to follow as any type of mistake can cause more damage to your system and can affect the system’s performance. So, if you are sure that you can execute the steps properly then you can go for this method otherwise choose other options in the list. I hope you would like this article and will be able to stop the automatic driver updates in Windows 10.
Also Read