When you power on your PC and see a black screen with the Windows or OEM logo and an error message occurs – ‘Fixing C Stage 2 issue,’ you will need to resolve it with the help of special tips and methods. And if you are searching for those tips, then you don’t need to look any further as we have got you covered.
From this tutorial, learn how to stop Fixing (C Stage 2) errors and also understand what the reasons are behind this error happening in the first place.
How to Stop ‘Fixing C Stage 2’ issue in Windows PC
In the below section, we will share the various ways in which this issue can be rectified.
Method 1: Allow Sufficient Time
During the fixing process, it’s important to be patient as the system completes the repair stage. Depending on the size and complexity of the issue, it may take some time to complete the fixing process.
Method 1: Let the Process Complete:
It’s crucial not to interrupt or forcibly shut down the computer while it is fixing the C stage 2 issue. Allow the process to complete without any interruptions, as interrupting it may lead to further complications.
Method 3: Check Hardware Connections:
Ensure that all the hardware components, such as hard drives and cables, are properly connected. Loose connections can cause issues during the fixing process. Consider reseating or reconnecting the hardware components if necessary.
Method 4: Advanced process
Altering the registry is possible in the way given here. Here’s how you can use an advanced means to Fix C Stage 2 issue.
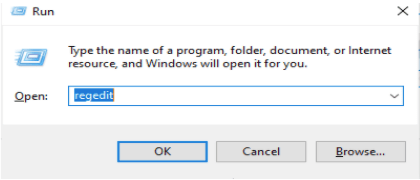
1. Open the Run window by clicking on the Windows and R keys.
2. Type ‘Regedit’ and then press on the ‘OK’ tab.
3. Once you can spot the Registry Editor window, you need to copy the following command and paste it into the space before pressing the Enter tab.
‘Computer\HKEY_LOCAL_MACHINE\SYSTEM\CurrentControlSet\Control\Session Manager’
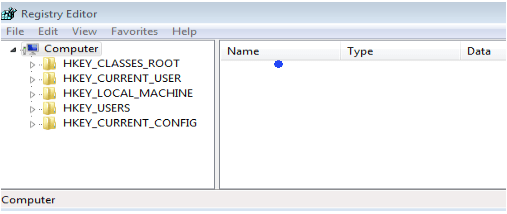
4. Search for the Boot Execute option and double-click on it and then check for the Edit Multi-String interface.
Set your valuable data and check on the Auto Check option. Ideally, alter the “auto-check autochk /k: C *.”
5. Press the ‘OK’ tab to complete the action.
6. Once done reboot your PC and when it starts next time you shouldn’t be encountering this error.
If you use the advanced technique, you will better benefit as it will resolve your issue permanently.
Method 5: Run Startup Repair
It is very common to face errors while using your PC. To solve these issues Windows has an inbuilt tool named Startup Repair. If you are facing any error then you can fix it by running startup repair.
Follow the given below steps to run Startup Repair:
- Firstly, shut down your PC by pressing the Power button for a few seconds.
- Then again press the power button to restart your system.

- When you see the PC manufacturer’s logo press and hold the power button for about ten seconds.
- After restarting your PC, click on Troubleshoot.
- Next, navigate to the advanced option.
- After that, click on startup repair.
Windows will take a few seconds to complete the process. After following all the steps, Fixing C stage 2 error will be fixed.
Method 6: Run an SFC Scan to Fix the error
When you run the SFC scan it will find all the corrupt and damaged files and also fix them. The corrupt or damaged files may be generated during installation.
Follow the given below steps to run the SFC scan:
- Firstly, boot your PC by using Windows Installation Media or safe mode.
- After that, click the repair option.
- Click on troubleshoot on the blue screen recovery window.
- Next, click on the advanced option.
- After that, click on Command Prompt.
- Now, enter the following command to run the SFC scan.
Sfc / scannow
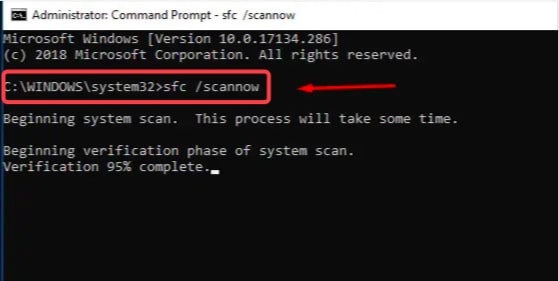
- When the SFC scan is complete restart your system.
Method 7: Run CHKDSK
You can Run the CHKDSK command to stop fixing the C stage 2 error. Follow the given below steps to execute this method:
- Press the Win key or click on the start icon to open the search bar.
- Type the command prompt in the Windows search box. After that, click on Run as Administrator.
- When the Command Prompt Window appears, type the command chkdsk c:/r.
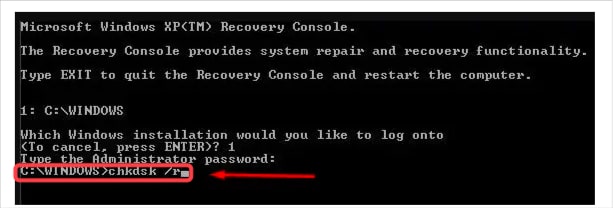
- If “chkdsk cannot run because the volume is in use by another process message appears, enter Y to say yes and press enter key.
- At last, restart your PC. This method will scan your PC for damaged and corrupted files and fix the issue.
Method 8: Use Restoro to Resolve the Issue
All the above methods are quite difficult and require some technical skills to execute. But many users lack skills and need software that can automatically perform all the major tasks to fix the issue.
Restoro is one software that can automatically scan for missing and corrupted files and replace them with appropriate copies. Apart from this, it can also fix all the other common issues and boosts your system performance.
It requires one or two clicks to repair your PC. Follow the given below steps to stop the ‘Fixing C stage 2’ issue.
- Firstly, download and install Restoro on your PC.
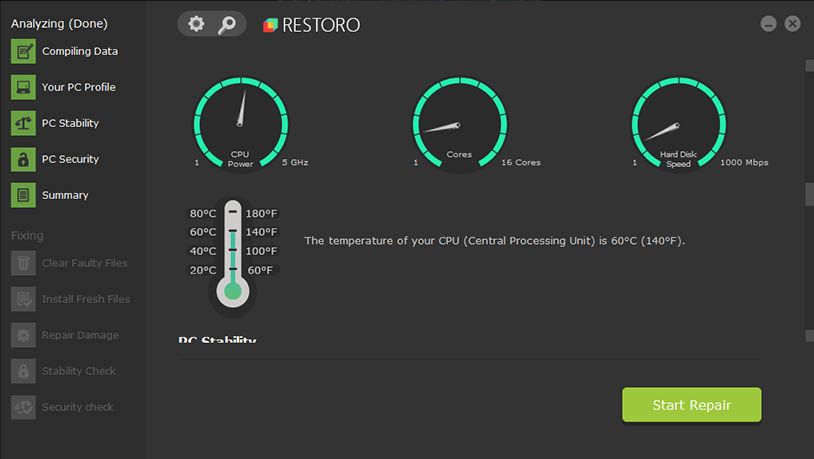
- After installing it, scan your PC.
- At last, click on the start repair option given bottom of the page in green color.
- Within a few seconds, it will fix the issues.
What is the ‘Fixing C Stage 2 issue?’
If you are seeing the Fixing C Stage 2 problem on your Windows screen, it would need to be resolved; otherwise, it will keep on happening.
This error pops up when the Disk Error Checking detects hard drive issues. This kind of error is usually seen on older hard drives.
There can be a maximum of four stages when Windows tries to automatically rectify the error. ‘Fixing C Stage 2 begins after Stage 1 and usually is shorter than the former.
What causes the ‘Fixing C Stage 2 issue?’
Several reasons can give rise to the Fixing C Stage 2 issue and they are;
- Frequent Power failure issues
- Corruption in the hard drive
- The shutdown was not proper the previous time
- The hard drive is damaged and destroyed
- A lot of junk files and a heavy load on the hard drive
- Your system has a virus
- Incorrect driver configuration
Conclusion
In conclusion, addressing the ‘Fixing C Stage 2’ issue involves careful consideration of your computer’s disk health and file system integrity. By following the steps outlined, including checking disk errors, updating drivers, and running system maintenance tools, you can effectively mitigate and resolve this issue.
Remember to regularly back up your data and keep your operating system updated to prevent similar issues in the future. With proactive maintenance, you can ensure a stable and reliable computing experience without interruptions from the ‘Fixing C Stage 2’ problem.
FAQs
What does fixing C stage mean?
The fixing C stage refers to the situation when Windows encounters some kind of inconsistency in the drives. It can have a maximum of four stages.
How do I stop Windows 10 C Stage 2?
There are some excellent and handy tips given in the above section of this blog that can help you resolve the Fixing C stage 2 problem.
Why is my HP laptop fixing C?
Your HP laptop is fixing C because it is encountering and identifying some inconsistencies with the device drivers.
What does fixing drive mean?
Fixing or repairing a drive refers to the process of disk checking that is initiated and executed by Windows Automatic Repair whenever the Windows system fails to boot properly. Automatic Repair then performs a diagnosis, scan, and repair of the C, D, and other drives.
What causes Scanning and repairing drive C?
“Scanning and repairing drive C” is a message that appears when the operating system detects potential errors or inconsistencies on the C drive during the boot process. This can occur due to various reasons, such as improper shutdowns, disk errors, file system corruption, or hardware issues. The system performs a scan to identify and repair any problems found on the C drive to ensure its proper functioning
Also Read