The new introduction of Windows 10 has caused a lot of questions from users about how to sync settings in Windows 10. Some have even become a little paranoid about the process and ask themselves if their computers will slow down once they go through the process. Fortunately, the process of Windows 10 sync settings is pretty simple and does not cause any problems.
Suppose a user has multiple operating systems and wants the same settings on every computer, then after turning on the synchronization settings. In that case, he can have the same settings on every PC. It is an essential feature as it keeps the user’s personal and device settings synchronized. You log into any PC with your account and can have the settings you set earlier.
Today, we are going to tell you all about Windows sync settings and how to turn on the sync setting on Windows.
Must Read – Best PC Cleaner – Clean your PC In 1 click
How to Sync Your Settings in Windows 10
Follow all the steps mentioned below to sync Windows 10 settings:
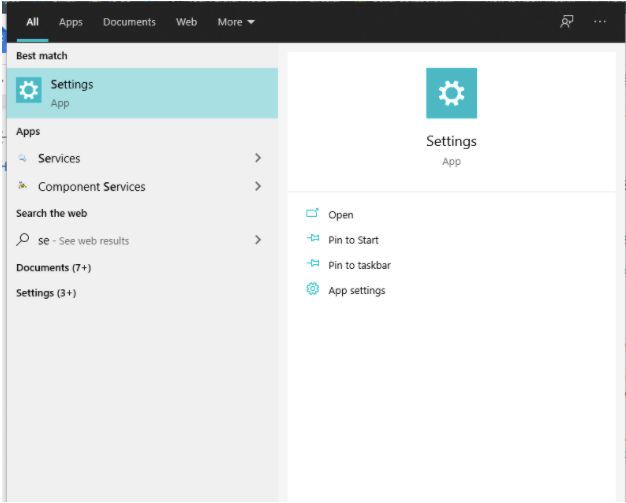
Step (1): First of all, navigate to the Start menu and search for the Settings.

Step (2): Now, on the Windows setting panel click on the Account option.

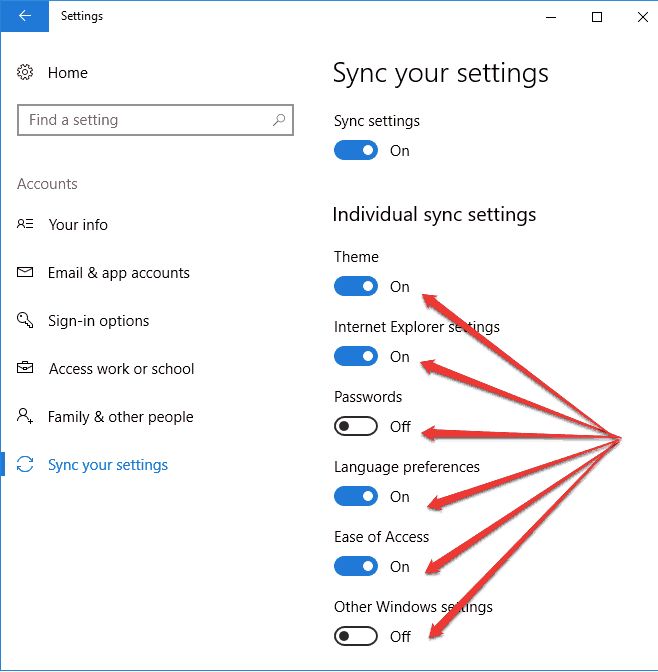
Step (3): Then the Account settings window will open, so click on the Sync your settings option from the left side panel.

Step (4): Turn on the Sync Settings option from the Sync Your Settings window.
It is a very important step in the synchronization process and you should not skip this. You need to remember these steps so that when you are trying to sync your settings in Windows 10, everything will go smoothly.
With its Sync option, Windows 10 enables owners of multiple devices to keep their system settings in line. The only requirement is that you are logged in to all devices with the same Microsoft account.
How to Turn On Sync for Individual Settings
The changes you make to the settings on a particular Windows 10 computer are replicated on other computers when you log into your account on that particular computer. Various settings can be synced between PCs via a Microsoft account, including stored passwords, preferred appearance options, and several other settings you can make on your desktop to personalize it.
Individual sync settings are settings that are transferred from one computer to another when you are logged into your Microsoft account.
Step (1): Navigate to Start -> Settings -> Accounts -> Sync Your Settings.
Step (2): When you’ll Turn on the Sync Setting option then you’ll get the individual sync settings option by scrolling down.

Step (3): Here click on the option for which you want to turn on the sync setting using the toggle button.
Now, only the individual options that you’ve turned on will be synced.
You can customize your synchronization settings to include or exclude themes, regional preferences, stored passwords, easily accessible options, file explorer, Microsoft Edge options, and more.
4 Ways To Fix Sync my settings not working in Windows 10
In a few cases, users fail to sync settings in Windows 10 because of numerous issues. When the problems occur, you can’t turn on the option of synchronization settings. To able to sync settings in Windows 10, you need to apply a few fixes. Through these fixes, you can get rid of the problem you face while doing sync settings in Windows 10. In the further article, you will get to know about the methods to fix your issue.
1. Change Diagnostics settings
You can try to change diagnostics settings so that you could turn on sync settings in Windows 10. To change diagnostics settings, you need to follow the instructions.
- Open the Settings app.
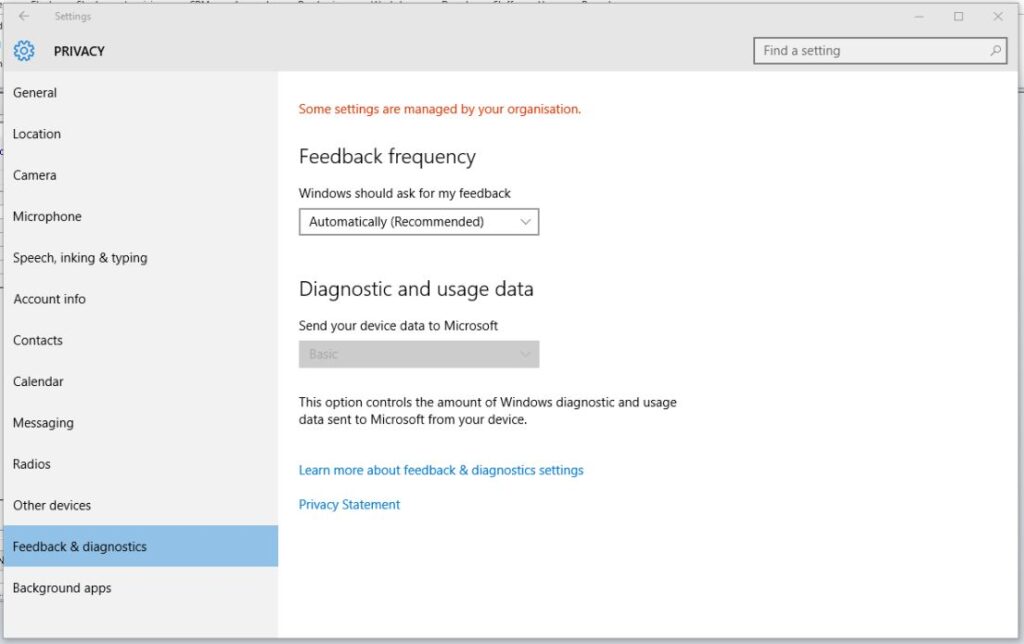
- Click on the Privacy, Feedback & diagnostics option.
- If your diagnostics and usage data settings are set to basic, you need to change it to Enhanced.

Now, after changing diagnostics settings, you will be able to sync settings in Windows 10.
2. Sign in with a different Microsoft account
Sometimes your Microsoft account acts weird and doesn’t let you sync settings in Windows 10. Because of the Microsoft account was damaged, you fail to sync settings. You can try logging into a different Microsoft account. To try another Microsoft account, you can follow the instructions.
- Go to the Settings account.
- Now, Click on the Add Microsoft account.

- Enter the credentials of the new Microsoft account in the section of Email and Password.
When you successfully log in to a different Microsoft account, you need to check if now you can sync settings in Windows 10. If still, you are failing to synchronize the settings, you can try another method.
3. Use the Microsoft account Troubleshooter.
If we don’t get any solution, then we try to troubleshoot the issue. You can troubleshoot your Microsoft account to see the problem occurring to sync settings in Windows 10. You can download and install the Microsoft account troubleshooter and know the issue which is happening. After learning about the case, you will get the option to resolve that fix. It would help if you decided it as soon as possible. The moment you complete the process of Microsoft account troubleshooting, you need to check if your sync settings are working.
4. Run an SFC scan
There is a simple way to get rid of any issue when you do the SFC scan. To run an SFC scan, you need to follow the instructions below.
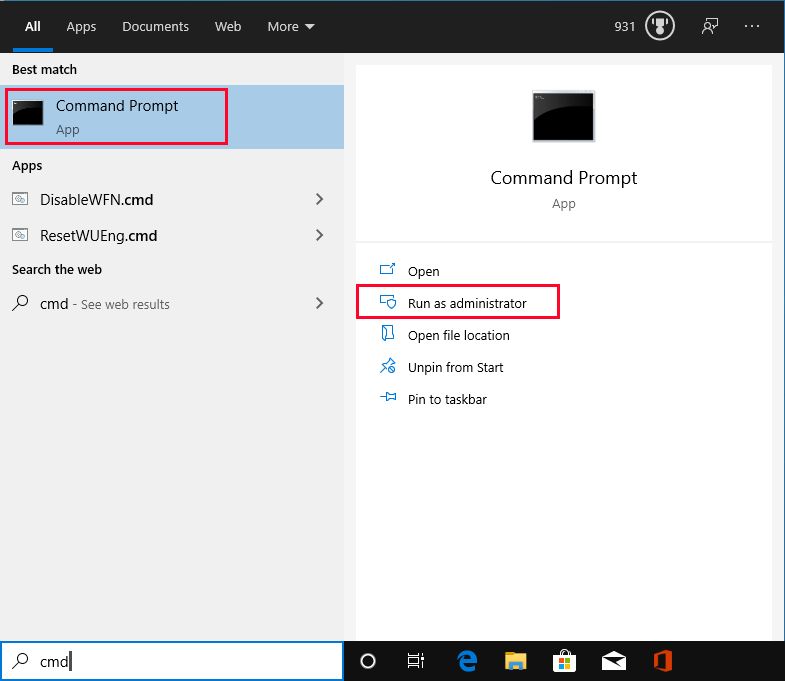
- Open the start menu and type Command Prompt in the search bar.

- Right-click on the Command prompt, which will come in the top results.
- Select the Run as administrator option.
- In the command prompt, type sfc/scan command.
After the scanning is complete, you need to see if the issue is gone. Try to turn on the sync setting in Windows and get to know if it is working.
Also Read


Cool a lot of good info.
hi my name is Sisasanda I would like to addmy google account on my Pc but it could sync the settings I do not know why?