Configuring a microphone in Windows is crucial for seamless communication and recording. From adjusting settings in the Sound Control Panel to troubleshooting driver issues, setting up a microphone involves a few steps to ensure proper detection and functionality.
Exploring these setup procedures enables users to optimize their microphone settings, ensuring crystal-clear audio input for voice calls, recording, or any other audio-related tasks on their Windows 10 device.
Installing USB Microphones and Basic Setup
If your USB microphone includes driver software, start by installing it and then restart your PC. Otherwise, plug your microphone into the computer’s appropriate port.
Wired Microphone Setup in Windows 10
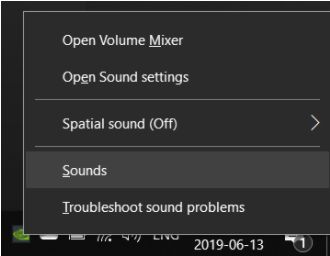
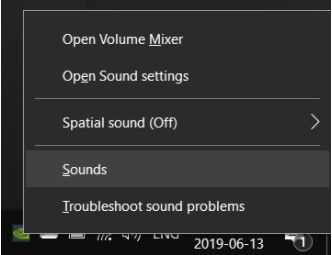
- Once connected, right-click the speaker icon in the taskbar and select Sounds.
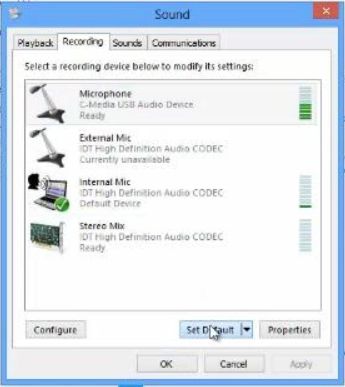
- Navigate to the Recording tab and set your microphone as the Default Device.
- Use the Configure option to set up and test your microphone through the Microphone Setup Wizard.
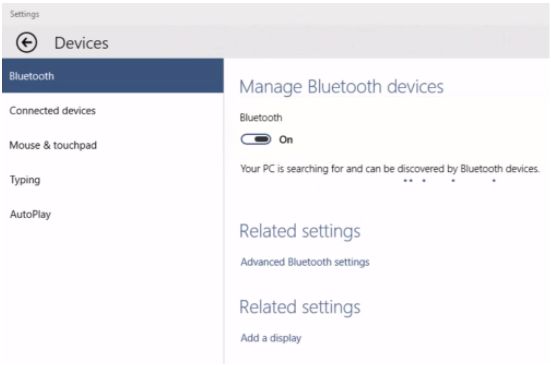
Bluetooth Microphone Setup in Windows 10
For Bluetooth microphones:
- Enable Bluetooth and add the device in Settings > Bluetooth & other devices.
- Pair your Bluetooth microphone and ensure it’s set as the default recording device in Sounds.
Configuring Microphones in Windows 11
- Open the Settings app from the Start Menu.
- Navigate to System > Sound.
- Under Input, choose a device for speaking or recording.
- Click the right arrow beside your selected device for microphone settings.
- Use the Start Test to verify your microphone’s functionality.
Bluetooth Microphone Setup in Windows 11
For Bluetooth microphones:
- Open the Action Center and enable Bluetooth.
- Head to Settings > Bluetooth to add the device.
- Select your Bluetooth microphone and complete the pairing process.
- Test your microphone using the same steps mentioned for USB microphones.
Testing Microphones in Windows 10
If troubleshooting is needed:
- Access Sounds > Recording to check the microphone’s status.
- If disabled, right-click and choose Enable to activate it.
- Speak into the microphone; green bars should indicate sound detection.
Your microphone is now set up and tested, ready for use in Windows 10 and 11.
How to Set Up a USB Microphone in Windows 10
If you want to set up a USB-powered microphone in Windows 10, you can do it with ease. If you have purchased a USB microphone that comes with its software, then the first step you have to do is install the software on your PC.
After installing software on your PC, you need to follow the steps.
1. First, you need to plug in the Microphone.
2. In the taskbar, you will see the speaker icon—Right-click on it.
3. Click on the Sounds option.
4. The Sounds windows will be open. Click on the Recording tab.
5. In the Recording tab, you will see the list of all connected microphones.
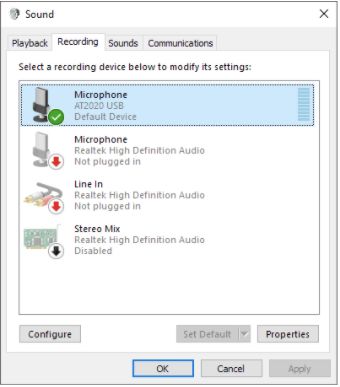
6. Check the Microphone you have connected set on the default device. If it is not placed on the default device, then right-click on the Microphone you have recently merged with your PC.
7. Select the Set as Default Device option.
8. Now, click on the Microphone.
9. Select the configure option.
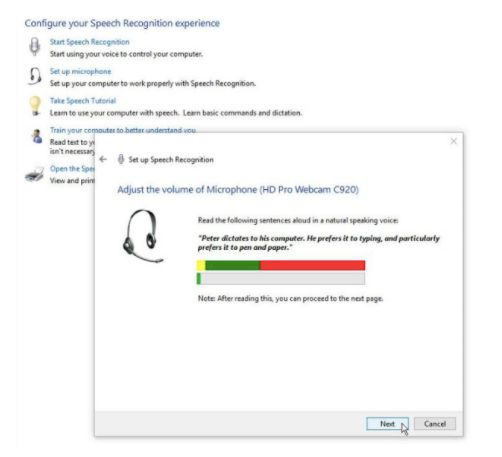
10. In the speech recognition window, select Setup Microphone.
11. The Microphone setup wizard will be open.
12. Click on the Microphone you have connected to your PC.
13. Select the Next option.
14. Now read the instructions carefully and click on the Next button.
15. You will see the next microphone setup wizard screen. Now speak into the Microphone.
16. The lower soundbar will move to the right when you speak. If it does, that means your Microphone is working.
17. Click on the Next button.
18. You will get the confirmation that your Microphone is set up successfully.
19. Click on the Finish button.
Hence, your USB-powered Microphone will be set up successfully on your computer. You can enjoy all the features of your Microphone now.
Set Up Wireless Microphone in Windows 10
If you want to Set up a Microphone in Windows 10, which is wireless, you need to use another method. The method to connect Bluetooth microphones in Windows 10 is easy. In today’s world, gamers prefer wireless Microphones to play their games.
Wireless Microphone doesn’t have any cable connection to your computer, so while playing the game, you can move quickly anywhere. There will be less risk if you use a wireless Microphone in Windows 10. To Set up a Microphone in Windows 10, you need to follow the instructions carefully.
1. First, you need to ensure that your wireless Microphone is on. If it is off, then turn it on right now.
2. In the Windows taskbar, you will see the Bluetooth option.
3. Right-click on the Bluetooth icon.
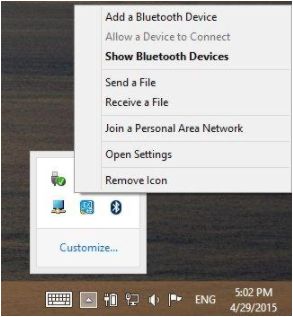
4. Click on the Add a Bluetooth Device option.
5. The Bluetooth & other devices window will be open.
6. In Bluetooth & other devices, check if the Bluetooth toggle is turned on. If it is off, then turn it on.
7. Now click on Add Bluetooth or other device option.
8. In Add a device, select the Bluetooth option.
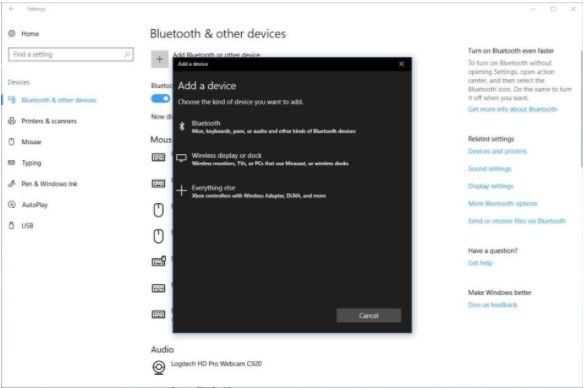
9. When you go to the next window, you will see your microphone device in the list. If the device is not on the list, then check it out if your Microphone is on. If it is listed, select the microphone device.
10. Once your wireless Microphone is paired, you will see the confirmation in the next window.
11. Click on the Done button after your Microphone successfully gets paired.
How to Test A Microphone in Windows 10
Once you Set up a Microphone in Windows 10, you need to test if your Microphone is working correctly. To check your Microphone, you need to follow the instructions.
1. In the Windows taskbar, Right-click on the Speaker icon.
2. Select the Sounds option.
3. In the Recording tab, you will see the list of Microphones and see the sound meter right there of your connected Microphone.
4. If the connected Microphone is grayed out and is on the disabled option, you need to enable it.
5. Right-click on the Microphone you have connected to your computer.
6. Select on Enable option.
7. Now, speak into the Microphone. If the sound meter goes green depending on how loud you talk, you have successfully set up a Microphone in Windows 10.
8. Click on the OK button to save your changes. If you haven’t made any changes, then click on Cancel.
Conclusion
Setting up a microphone in Windows involves more than just connection; it’s about optimizing audio for your digital experience. From choosing the right connection to tweaking settings and troubleshooting, this process ensures seamless communication and recording, enhancing your interaction with the Windows environment through crystal-clear sound.
Mastering these steps unleashes the full potential of your mic, elevating your computing encounters with pristine audio clarity and tailored settings.
Also Read