Windows 10 allows its users to take advantage of working on multiple applications by splitting the screen. Windows has this feature which it easy for you to multitask. Windows 10 gives you a way to split the screen into two different windows by shifting the edges of the screen. You can also split the screen into more than two windows by shifting the mouse to the corner of the screen.
Through the multiple-screen option, it becomes easier for you to perform a copy-paste operation quickly. In this article, we are going to learn about how to share the screen to perform multiple tasks at the same time on the Windows system.
Must Read – Best Free PC Cleaner
How To Split Screen In Windows 10
Whenever we use the computer, we open the various windows to find the variety to complete the task we have.
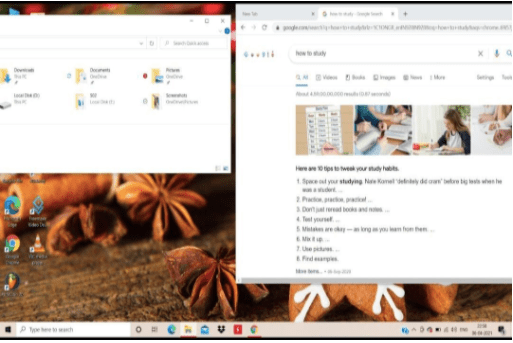
If you have a large display, you can have the two windows at one time. One screen stays on the left; another one is on the right. With your split screen in Windows 10, you can make your work easier and simpler.
1. How to divide the screen between two application windows.
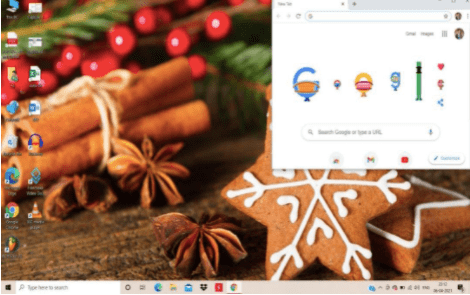
1. The first step to split the window is to select the application window that you want to slide on the side of the screen. Tap on the application window’s upper edge and slide it to the corner of the window until your mouse reaches the end of the screen. Once you drag the noise to the corner of the screen leaves the mouse.
2. Make sure that the sliding window is not snapped too much, all the other the application should appear on the screen.
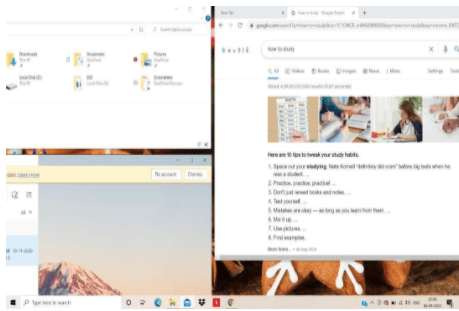
3. Now choose the other application window that you need on the other half of the screen. This way you will have two windows on both sides. The screen will automatically be shared equally between the two program windows. Therefore, if you need to change the size of the screen, tap in the middle of the windows to turn the pointer into a two-sided arrow. Now click and drag the pointer to adjust the width of the program window.
2. How to divide the screen between more than two program windows
In case you have a large laptop display then Windows 10 also gives you an option to fit three to four displays on one screen.
This method is also equivalent to the upper method, therefore it will be quite easy for you to split the screen between three or four program windows.
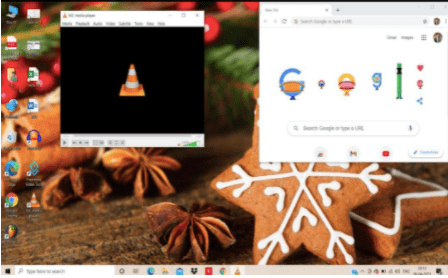
1. Select the program that you will work on, so drag the window page by clicking on the main bar. Move the program window to one of the corners of the window. Once the application window is at the correct place leave the mouse button.
2. Similarly, drag the other application window on the other side of the screen. Try to keep both the window size equal to make it look presentable. After taking the application window to the other side of the screen leave the mouse button.
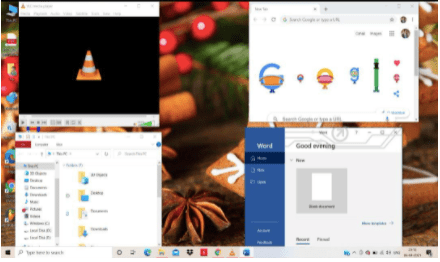
3. You can see all the other applications on the left side of the screen. You can choose any of the windows to open and drag it to the other side of the screen. You can also pin any four applications that you want to share the screen with.
4. Click on the remaining program so that you can make use of it. Take the four pinned window application and take them to the left corner of the screen.
If you want to remove any of the windows, simply tap the title bar and move it away from the corner.
Split Screen In Windows 10 through the Inbuilt feature.
In the above method, we have explained how you can split the screen into two and three or four just by following a few basic steps. Now in this part of the article we are going to tell you how you can get the split-screen by using the ‘Snap assist’ assist’ feature.
This feature allows the user to drag and drop the application window at the edge of the screen.
3. How to turn on the Snap Assist feature.
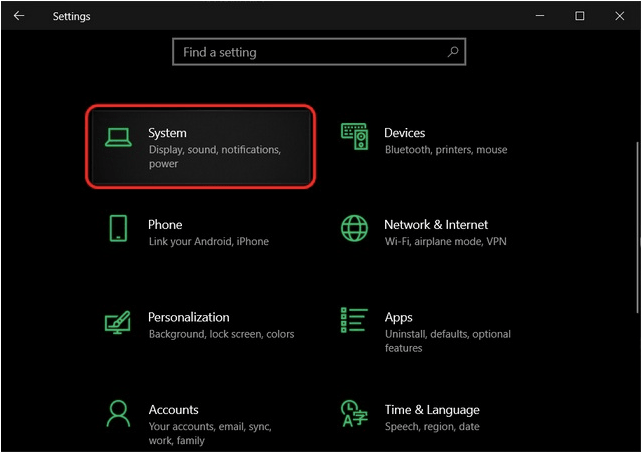
1. To turn on the Snap assist feature, click on the shortcut Windows key + I.
2. Now click on the system and choose the multitasking option from the expanded list.
3. On the left pane, tap on ‘Multitasking’. Now ensure that the toggle under ‘Snap windows’ is turned on

4. Make sure all other 3 options should be turned On
Go for any of the Snap assist options
5. You can manage the application windows automatically by dragging and dropping the windows page at the edge or corner of the screen.
6. You can adjust the size of the window page by the double arrowhead pointer.
7. When you snap any of the application windows, it shows the possible program that you can put next to the application window placed on the screen.
8. When you adjust the size of the windowpane, it automatically changes the size of the other window.
4. Learn how to split the screen.
1. Open up two or more applications on your PC.
2. Keep the mouse on an empty area of any of the window, press the left button of the mouse and drag the window to side of the screen.
3. Make sure that you move the application window till the mouse allows you to shift.
4. Leave the mouse after you snap the window to the left side of the screen. The application window will occupy half of the screen or the corner side of it.
5. Now you can choose any of the other application to place on the right side of the screen.
6. After you place the windows equally, make sure to separate both the windows for your convenience. Adjust the size of both windows to make it look presentable.
Unable to split-screen in Windows 10
If you ever face the problem of not split the screen in Windows 10, you can resolve the issue most easily. There are two methods which you can try to overcome the problem you are facing. To know the techniques, watch out for the further article.
1. Run hardware troubleshooter
The first method to resolve the issue of not able to split the screen in Windows 10, you need to follow the instructions below.
- Press Windows + Q and type troubleshooting.
- Select the Troubleshooting option.
- Click on the View All option.
- Click on Hardware & devices.
- Now, you need to follow the on-screen instruction to run the hardware troubleshooter.
That is how you can resolve the issue. You can try the above methods to know how you can split the screen in Windows 10, and see if you are able to do it. If not, you can perform another method.
2. Windows Update
The next method you can try is to do the Windows update, and it will help you split the screen in Windows 10. To know the way, follow the instructions below.
- Firstly, disconnect all your devices except the keyboard & mouse.
- Restart your PC.
- Go to Windows Update.
- Click on the Check for Updates option.
Windows will scan your PC and informs you about the updates you need to do. Update the drivers, the system tells you to do. Check it out if you are able to split the screen in Windows 10.
Conclusion
We hope that you must have got the idea of how to split the screen amongst two or more than two windows. In the above methods, it’s clearly explained how to step by step you can divide the screen to do multitasking.
Nowadays it has become important to do multitasking so that it takes less time to perform your task. By splitting the screen, it becomes easy for you to perform all the operation quickly. For example, if you want to copy paste a single line, then you have to copy that line from one page and then open another page to paste the line. By dividing the screen into two, you can do that operation quickly without moving to another page.
Also Read


