There are several reasons why the Windows 11 cumulative update would fail and some of the below given reasons are often the cause. Reasons why your Windows 11 cumulative update failed would include these below given reasons:
1. If the cumulative update is not available for your site try to run it for yourself
2. Those who face an issue with Microsoft servers need to check for it thoroughly.
3. The internet connection needs to be steady and checked regularly if you don’t want to have any issues with the process.
4. Bandwidth restrictions exist with Windows 11. Check your bandwidth and ensure you have the right one.
5. Firewall or antivirus setting issues must be rectified as soon as they are identified.
6. An inadequate amount of RAM could lead to such issues. Fix it and ensure there is enough space again.
7. The Windows update service not functioning so try to make it work
Cumulative updates are released regularly and fix any outstanding problems they might have found since the previous update.
Fixing bugs, stabilizing the scenario, and improving performance are some of the targeted goals of cumulative updates.
But if you are using an older version of Windows 11, you might want to check again as some updates that mismatch might lead to more problems than resolutions.
What do you do when the Windows 11 cumulative update fails to run the right way?
First start by making some petty fixes and then move on with the different processes to ensure you have tried all before you call an expert for a thorough look.
1. Start by checking if your system has all the minimum requirements needed to download the Windows 11 cumulative update.
2. If you have recently run on some updates and you are pending a reboot, ensure you complete the process before trying for the Cumulative Windows 11 update.
3. Test and refix your internet connections by connecting your Ethernet cable to your modem or router.
4. Create enough storage space in your device so that you are not short of RAM at the end of the day.
Windows 11 Cumulative Update Failed: 6 Ways to Install It
If all this is correct and your Windows 11 cumulative update failed, you can try these below fixes to ensure you have a smooth go about it.
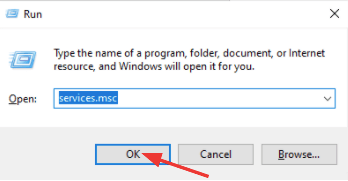
1. Reboot the Windows update service
Here is the process you will need to follow to restart the Windows update service.
1. Press the Windows + R tabs and when the Run command opens, type services.msc and then click on the OK tab.
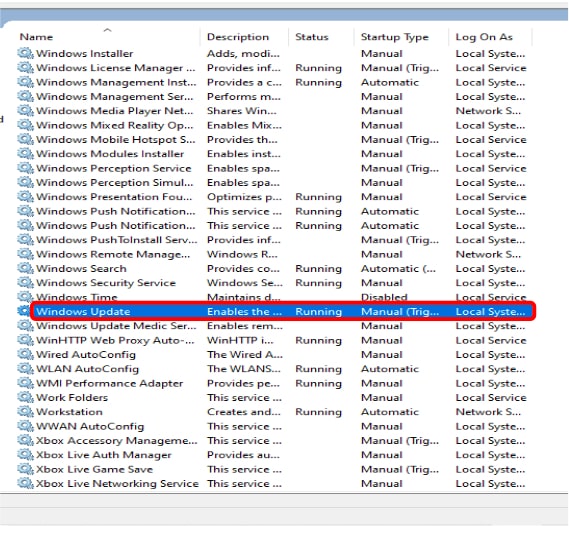
2. Scroll down to the Windows update option, right-click on the tab, and then select the Properties tab.
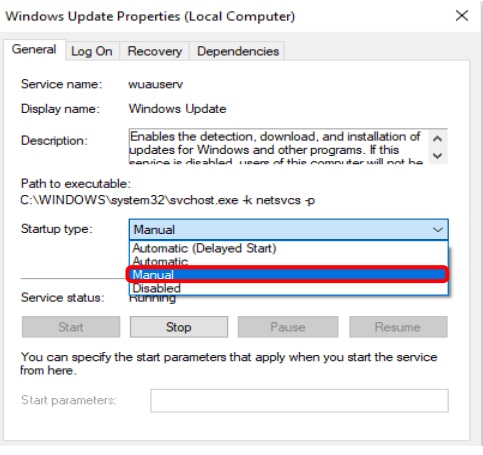
3. From the General tab, choose the Startup Type option and select the Automatic option from the available options in the dropdown (manual, automatic delayed download, automatic, and disabled), and then click on the Start button.
4. Available options in the dropdown (manual, automatic delayed download, automatic, and disabled), and then click on the Start button.
If this works out fine for you and helps resolve the Windows 11 cumulative update failed scenario, you don’t have to proceed with the next processes as given below.
2. If you are using an antivirus, disable it
To disable an antivirus, a reason behind your Windows 11 cumulative update failed scenario, follow the quick process as given here if you are not aware of how to turn it off for a while.
Most of us rely on anti-viruses nowadays but if you are aware that they protect you, they might also be hindering some key processes.
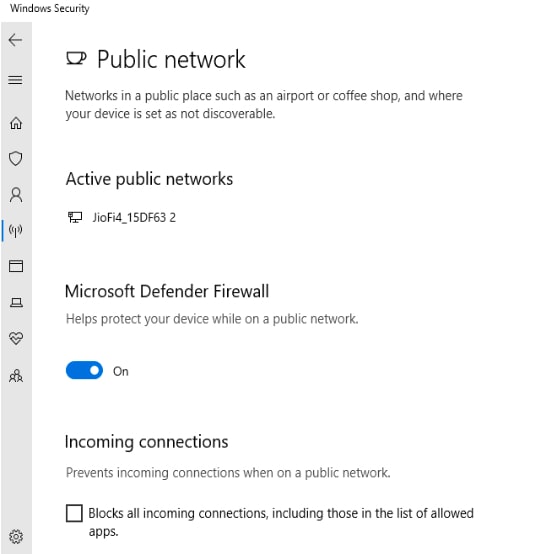
1. Go to the Windows option, and then after typing Windows Security in the search tab, you will need to click it open.
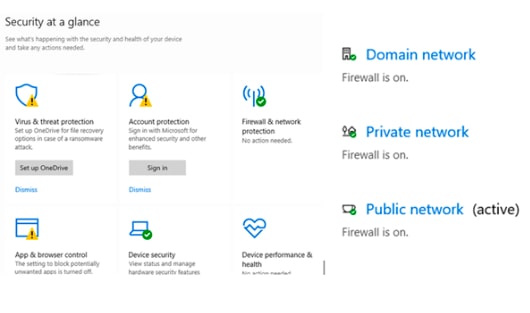
2. From Firewall and Settings, choose the Public Network option, and then from the options available, find the Microsoft Defender Firewall option and then turn it off.
3. Try by running the Windows Update Troubleshooter
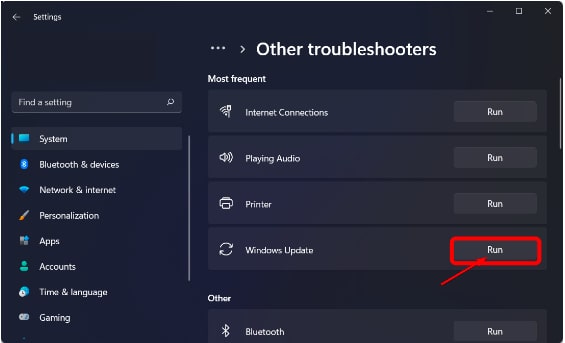
1. Go to Settings after pressing the Windows key and then from the System option, choose the Troubleshoot tab.

2. Next, choose the tab that says other troubleshooters and then press the Run option beside the Windows Update troubleshooter.
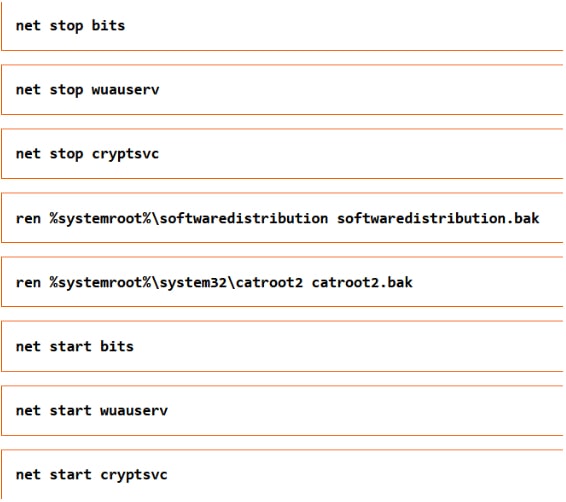
4. Create a New Name for the Software Distribution Folders on your device
Here is another process that can help restore the Windows 11 cumulative update failed option.
1. From the Windows key, type in CMD and then run it as administrator.
2. Next, enter the below list of commands and after entering each command, press the Enter tab.
5. If the Windows 11 cumulative update failed to upload, you must do it manually.
Follow the below process to achieve your options.
1. Browse through the Microsoft catalog page and search for the cumulative update that failed with you. Click on the Download tab located beside the option to get it manually.
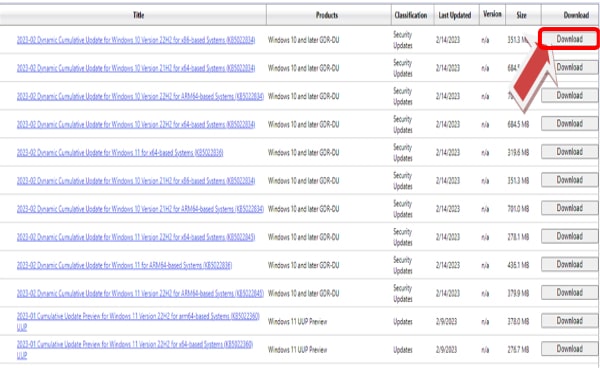
2. After clicking on the Downloaded file, you must use the on-screen prompts to install the update.
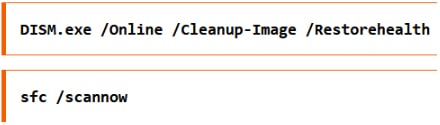
6. Run the DSM and SFC Scans
Type CMD in the search menu and then run it as an administrator. After typing the below commands, and pressing the Enter tab after entering each one, you will need to restart your system.
Conclusion
Those who have already fixed the issues earlier know how best to work around them. Your system might just be so, but if you are unable to figure it out, resort to such articles which can only strengthen your understanding of what is possible and what is not with your system.
Additionally, using our ways you can fix this Windows 11 cumulative update failed issue quickly.
Also Read